6.13 gEDA/gaf Switcap Symbols and Netlister
by: Dan McMahill
This document is released under GFDL
April 13th, 2003
The original document can be found at
The main SWITCAP page is at http://www.cisl.columbia.edu/projects/switcap/
There you can find the full reference manual of the program.
Some probably useful tips can be found at https://web.engr.oregonstate.edu/~moon/kaj/swtips.html#manual
- Overview
- Requirements
- Creating Schematics
- Extracting the SWITCAP Netlist
- Running SWITCAP
- Appendix A – Symbols in the Library
- Example
- Document Revision History
6.13.1 Overview
This document describes the symbol library and lepton-netlist backend
which supports driving SWITCAP simulations from the Lepton system.
SWITCAP is a switched capacitor circuit simulator available from
Columbia University. It is used in many classroom and research
environments. One drawback to SWITCAP is the lack of a freely
available schematic capture frontend. The Lepton SWITCAP symbol
library and lepton-netlist backend tries to fill that gap.
The basic steps involved with using Lepton as the frontend for SWITCAP simulations are:
- Create schematics of the circuit.
- Create an analysis file.
- Extract the netlist.
- Run the SWITCAP simulation.
- Run
sw2ascto extract the results. - View the results with
gwave.
6.13.2 Requirements
You will need the following programs to be installed:
- A version of Lepton EDA.
- SWITCAP. The executable is usually called
sw. If you do not have SWITCAP available on your system, you will need to contact Columbia University to obtain a copy. The Lepton SWITCAP support was tested with SWITCAP Version A.5R Release 21-Sep-87. - Although it is optional, you may wish to install a tool which can be
used for plotting the output data. SWITCAP produces both ASCII data
listings as well as ugly ASCII plots (note the release date of the
version of SWITCAP used). Suitable tools are:
- Gwave. Gwave is an analog waveform viewer. It is fairly basic, but easy to use, includes cursors, and has zoom/pan features. See http://gwave.sourceforge.net/.
- Scilab. Similar to matlab. Powerful, but no cursors or panning. See https://www.scilab.org.
- Octave. Similar to matlab. See http://www.octave.org/.
- Grace. See http://plasma-gate.weizmann.ac.il/Grace/.
The utility sw2asc(1) mentioned above can be used to convert
a SWITCAP2 output file into ASCII data files that the above GUI tools
can read. It is not installed by default, you can find it in the
contrib/ directory of the Lepton repository or tarball.
6.13.3 Creating Schematics
6.13.3.1 Required Symbols
This section assumes you are familiar with using lepton-schematic to
create and edit schematics. SWITCAP netlisting is only supported for
the components contained in the SWITCAP symbol library as well as the
ground symbol found in the power library which comes with
Lepton. All allowed SWITCAP elements except for subcircuits are
supported. You must include the following elements on your
schematic:
- One instance of the switcap-timing symbol. This symbol will set the master clock period for your simulations.
- One or more instances of the switcap-clock symbol. This symbol defines a clock with a particular phase and period. The reference designator of the clock symbol is used by the switches to set what phase they switch on.
- One or more instances of the switcap-analysis symbol. This symbol defines an analysis by specifying a file to include in the SWITCAP netlist. By including multiple instances of this symbol, multiple analysis files may be included.
6.13.3.2 Optional Symbols
You can also optionally add the following SWITCAP special symbols to your schematic:
- Zero or one instance of the switcap-title symbol. This will add a TITLE: line to the SWITCAP netlist and will appear in the output file.
- Zero or one instance of the switcap-options symbol. By editing the OPTIONS attribute on this symbol you can set the various options which can be passed to SWITCAP.
6.13.3.3 Net Names
When creating schematics to drive SWITCAP, you should name all nets that you wish to plot. To avoid possible conflicts with unnamed nets, you should avoid using purely numerical names for nets because all unnamed nets will be assigned (somewhat randomly) numbers without checking for possible conflicts with explicitly named nets. SWITCAP limits the length of node names to 7 characters.
6.13.3.4 Switches
When placing switches on your schematic, you will need to define which clock they are controlled with. This is done by setting the clock attribute on the switch to the reference designator of the clock which should control it.
6.13.4 Extracting the SWITCAP Netlist
To extract the SWITCAP netlist, run:
lepton-netlist -g switcap -o test.scn file1.sch [file2.sch ...]
For the example file contained in this archive, you can run:
lepton-netlist -g switcap -o example.scn ckt.sch clocks.sch analysis.sch
The netlist will be left in example.scn.
6.13.5 Running SWITCAP
I typically use something like:
printf "example.scn\nexample.out\n" | sw
so I can use command history to rerun SWITCAP without having to manually type the file names each time.
Refer to the SWITCAP manual for more details.
6.13.6 Appendix A – Symbols in the Library
- Capacitors (switcap-capacitor)
- Switches (switcap-switch)
- Independent Voltage Sources (switcap-vsrc)
- Dependent Voltage Sources (switcap-vcvs)
- Clock Specification (switcap-clock)
- Master Timing Specification (switcap-timing)
- Analysis File Include (switcap-analysis)
- Simulation Title Specification (switcap-title)
- Simulation Options Specification (switcap-options)
6.13.6.1 Capacitors (switcap-capacitor)
Ideal capacitor. Attributes:
C=capacitanceRequired. Specifies filename to be included.
refdes=reference designatorRequired. Must start with
Cand be unique.
6.13.6.2 Switches (switcap-switch)
Ideal switch. Attributes:
clock=Controlling clockRequired. Specifies which clock controls this switch.
refdes=reference designatorRequired. Must start with
Sand be unique.
6.13.6.3 Independent Voltage Sources (switcap-vsrc)
Attributes:
refdes=reference designatorRequired. Must start with
Vand be unique.
6.13.6.4 Dependent Voltage Sources (switcap-vcvs)
Attributes:
gain=gainRequired. Specifies the gain of the controlled source.
refdes=reference designatorRequired. Must start with
Eand be unique.
6.13.6.5 Clock Specification (switcap-clock)
Attributes:
PSTART=starting clock phaseRequired. Specifies on what phase of the master clock this clock turns on.
PSTOP=ending clock phaseRequired. Specifies on what phase of the master clock this clock turns off.
PERIOD=clock periodRequired. Specifies the period of the clock in terms of master clock cycles.
refdes=reference designatorRequired. The switches that are controlled by this clock will refer to it by the reference designator. As such, avoid running any reference designator renumbering tools.
6.13.6.6 Master Timing Specification (switcap-timing)
Attributes:
PERIOD=clock periodRequired. Specifies the period of the master clock in seconds.
Only a single instance of this symbol is allowed.
6.13.6.7 Analysis File Include (switcap-analysis)
This symbol will cause a specified file containing SWITCAP analysis commands to be included in the output netlist. Attributes:
file=filenameRequired. Specifies filename to be included.
6.13.6.8 Simulation Title Specification (switcap-title)
Attributes:
TITLE=switcap titleRequired. Specifies the TITLE line for the SWITCAP netlist.
Only a single instance of this symbol is allowed.
6.13.6.9 Simulation Options Specification (switcap-options)
Attributes:
OPTIONS=switcap optionsRequired. Specifies the OPTIONS line for the SWITCAP netlist. See the SWITCAP manual for allowed values.
Only a single instance of this symbol is allowed.
6.13.7 Example
This appendix provides a simple example of the entire process of generating a schematic, producing a SWITCAP netlist, running a simulation, and plotting the results.

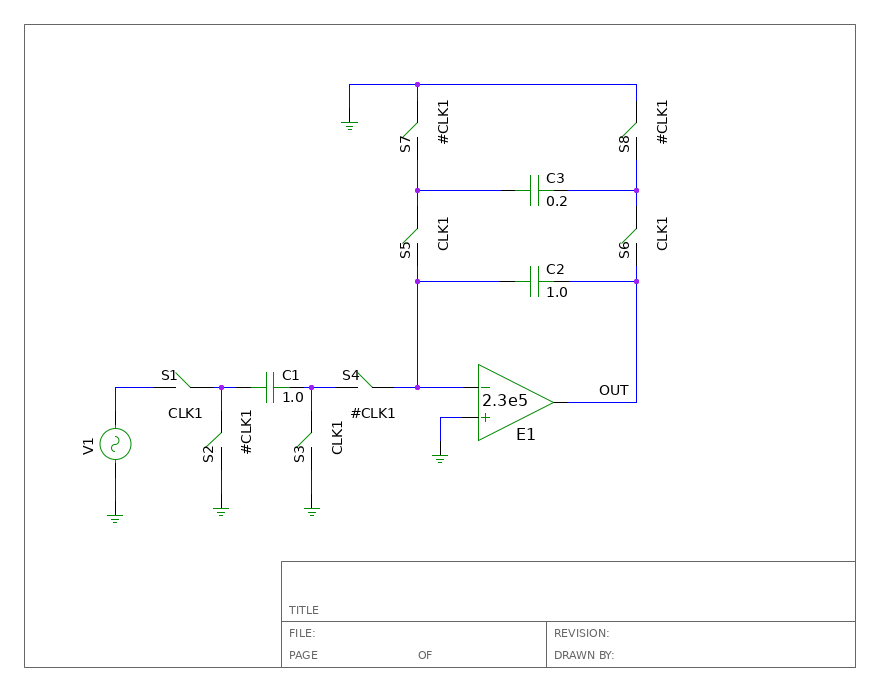
Figure 6.3: Simple switched capacitor circuit

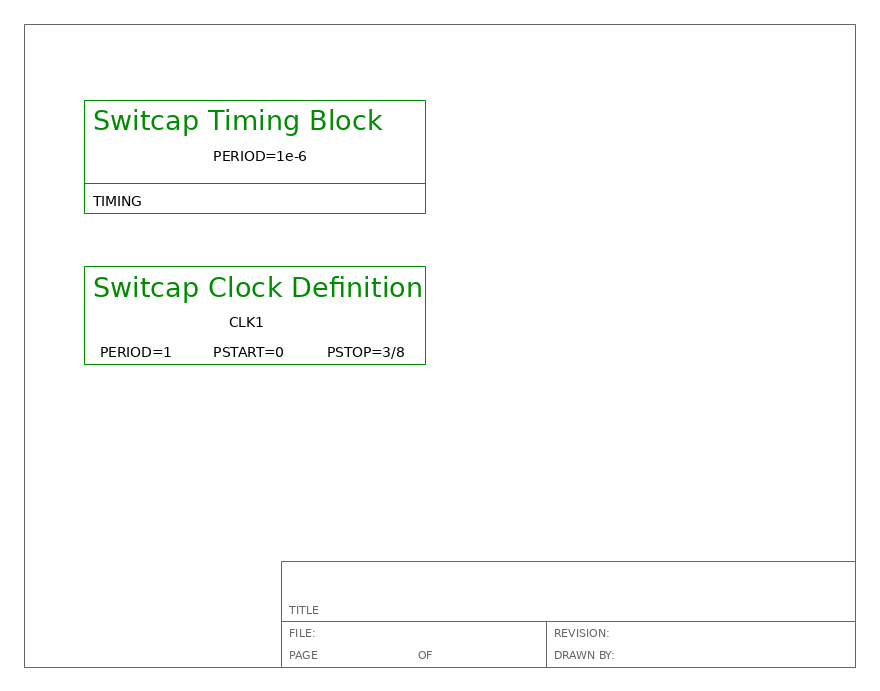
Figure 6.4: SWITCAP clock definition schematic

Figure 6.5: SWITCAP analysis definition schematic
ANALYZE SSS;
     INFREQ 100.0 1.0E6 LOG 501;
     SET V1 AC 1.0 0.0;
     PRINT VDB(OUT) VP(OUT);
     END;

ANALYZE TRAN;
     TIME 0+ 500 1
     SET V1 PULSE 0 5 10e-6 5e-6 5e-6 100e-6 500e-6;
     PRINT V(OUT);
     END;
Figure 6.6: SWITCAP analysis file, test.ana
6.13.7.1 Example Schematics
Figure 6.3 shows the schematic of a simple switched capacitor circuit. Note that some switches, S1 and S3 for example, are controlled by CLK1 while others, S2 and S4 for example, are controlled by the complement of CLK1 (#CLK1).
Figure 6.4 shows the definition of a clock and the master clock. Here we define a master clock period (mcp) of 1.0 μs in the timing block. In the clock definition symbol, we define a clock called CLK1 that has a period equal to 1 master clock period (mcp). The phase of CLK1 turning on switches is 0 and the phase of CLK1 turning off switches is 3/8 mcp. Additional clock phases can be defined by creating more instances of the clock definition symbol.
Figure 6.5 shows an instantiation of the title block symbol which
will cause “my title” to be used in the TITLE line in the
SWITCAP netlist. Figure 6.5 also shows an instantiation of an
analysis block which directs the netlister to include the contents of
the file test.ana in the output netlist.
Figure 6.6 shows the contents of the test.ana file.
6.13.7.2 Netlist the Design
To netlist the design, run:
lepton-netlist -g switcap -o example.scn ckt.sch clocks.sch analysis.sch
6.13.7.3 Run the Simulation
Run the simulation with:
printf "example.scn\nexample.out\n" | sw
6.13.7.4 Process the Results
Convert the SWITCAP output file to something gwave can read
by running:
sw2asc example.out
6.13.7.5 Plot the Results
Start up the gwave program and load the first sinusoidal
steady state result by running:
gwave example.out.SSS.1.asc
Drag the two waveforms onto the two waveform panels and change the
x-axis to a log scale. Figure 6.7 shows the output. Start up
the gwave program and load the transient result by running:
FIXME: If you have access to the SWITCAP program, please consider sending us the picture with simulation results for documentation.
Figure 6.7: Simulation Results - Sinusoidal steady state
gwave example.out.TRAN.1.asc
Drag the output waveform onto the waveform panel. Figure 6.8 shows the output.
FIXME: If you have access to the SWITCAP program, please consider sending us the picture with simulation results for documentation.
Figure 6.8: Simulation Results - Transient
6.13.8 Document Revision History
- April 13th, 2003
Created switcap.tex